Tag: windows

  • So sánh Macbook và laptop Windows

    So sánh Macbook và laptop Windows

    Nếu như điện thoại thường được chia thành 2 thế giới Android và iPhone, thì máy tính xách tay có 3 lựa chọn phổ biến nhất là laptop chạy hệ điều hành Windows, máy tính chạy Linux và MacBook của riêng Apple với hệ điều hành MacOS.

    Tuy nhiên, xét về mức độ phổ biến nhất thì là Windows và Macbook, hãy cùng so sánh Macbook và laptop Windows để tìm ra lựa chọn tối ưu nhất.

    So sánh Macbook và laptop Windows: Hệ điều hành

    Hệ điều hành Windows

    Windows là hệ điều hành phổ biến nhất thế giới với hàng tỷ người dùng. Vậy nên điều đó cũng đồng nghĩa với việc ai ai cũng có thể quen dùng laptop Windows một cách dễ dàng.

    Nó có ưu điểm lớn hơn đối thủ là tính tương thích cao hơn. Có không ít phần mềm chỉ có thể chạy trên Windows mà không dùng được với máy Mac.

    Vậy nên nếu bạn có nhu cầu đặc thù cần dùng 1 ứng dụng nào đó thì nên tìm hiểu trước máy mình sắp mua có hệ điều hành dùng được nó hay không.

    So sánh Macbook và laptop Windows
    Giao diện Windows 11 mới nhất và giao diện macOS

    Hệ điều hành macOS

    Là hệ điều hành được coi “khó tính” hơn, macOS có thể khiến một số người chưa sử dụng bao giờ lúng túng trong thời gian đầu dùng máy. Nhưng một khi đã quen thuộc thì hệ điều hành này cũng có rất nhiều điểm, tính năng thú vị riêng của mình. Nó có hệ sinh thái Apple với một số phần mềm, tính năng độc quyền hiện đại và không có ở hệ điều hành khác.

    Tuy nhiên, Windows vẫn tồn tại rất nhiều hạn chế. Windows khó lòng chạy mượt mà nếu như máy chạy core i3, RAM 4 GB và ổ cứng HDD. Hiện tượng “100% disk” sẽ xảy ra thường xuyên nếu như chiếc máy tính Windows của bạn có cấu hình yếu. Đơ, giật, xử lý dữ liệu lâu, mở máy chậm, dừng ứng dụng đột ngột là tình trạng chung của nhiều máy tính Windows. Chỉ cần 1 tab Chrome cũng đủ làm chiếc máy tính Windows của bạn khốn đốn. Do đó đòi hỏi người dùng phải dử dụng máy tính Windows cấu hình cao hoặc sau 1 thời gian thì nên nâng cấp cỗ máy già cỗi của mình.

    So sánh Macbook và laptop Windows 1

    Chưa kể, nếu dùng 1 thời gian, Windows thỉnh thoảng xảy ra tình trạng màn hình xanh. Lỗi này xảy ra do nhiều nguyên nhân trong quá trình sử dụng. Mình cũng thường xuyên bị tình trạng này và khi đem máy đi sửa thì cũng chỉ có cách reset hoặc cài lại Win.

    So sánh CPU
    So sánh Macbook và laptop Windows
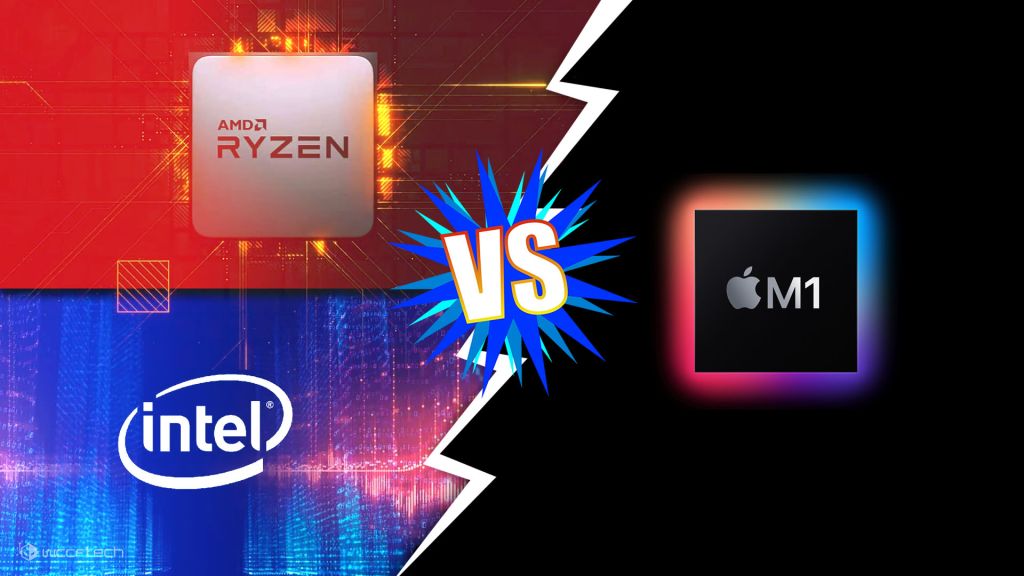
    Macbook đời mới hiện nay đều sử dụng chip của Apple với sức mạnh khủng khiếp
    • Laptop Windows. Hầu các dòng laptop Windows hiện nay đều được trang bị các loại chip đến từ 2 hãng lớn nhất là Intel và AMD. Bạn sẽ thấy những đời chip quen thuộc nhà Intel như Core i3, Core i5, Core i7, Core i9,… AMD được coi là con chip có giá rẻ hơn một chút nên cũng hay xuất hiện ở các mẫu trung và bình dân. Về sức mạnh cụ thể thì chúng ta cần phải xét đến từng sản phẩm một.
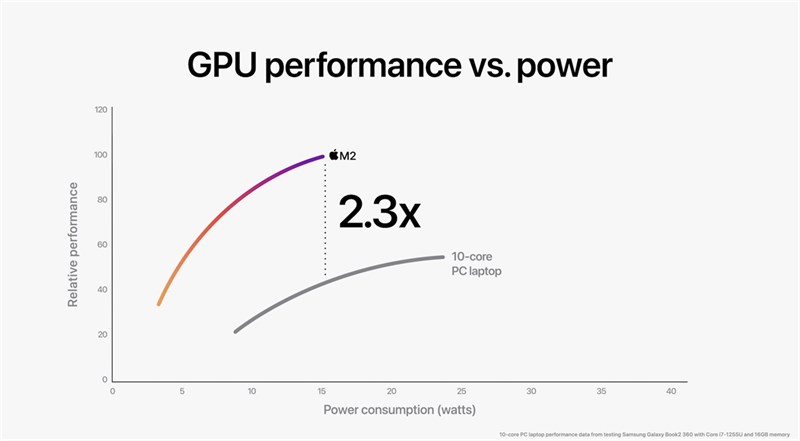
    • MacBook trước năm 2020 thì sử dụng chip của Intel. Cuối năm 2020, Apple đã chính thức tung ra một con chip hoàn toàn của riêng mình là Apple M1. Những đời MacBook mới nhất đều đã được chuyển sang dùng Apple M1, M2 với sức mạnh “khủng” hơn nhiều so với Intel trước đó.
    So sánh Macbook và laptop Windows 2

    So sánh hiệu suất máy tính

    Đối với laptop Windows, để nhận định hiệu suất thì chúng ta phải xem thông số của từng máy cụ thể. Có sản phẩm bình dân dưới 10 triệu thì hiệu suất không thể quá tốt. Nhưng cũng có những sản phẩm lên tới 40, 50 triệu hay thậm chí hơn cả thế nữa thì sở hữu sức mạnh cực khủng, đặc biệt là các laptop gaming.

    Trong khi đó, MacBook chỉ là laptop của 1 hãng sản xuất Apple với phân khúc cũng được định hình rõ ràng từ đầu, đó là cao cấp. Hiệu suất của MacBook, ngay cả đời máy cũ cũng được tính là thuộc mức tốt trở lên khi đặt lên bàn cân chung so với cả thị trường.

    Ngoài ra MacBook còn nổi tiếng vì độ bền bỉ theo thời gian, dùng nhiều năm cũng không xuống cấp nhiều.

    Cho nên nếu so cùng cấu hình các thiết bị MacBook sẽ có hiệu năng vượt trội hơn so với các thiết bị laptop Windows. Tất cả những thiết bị MacBook đều được hỗ trợ SSD nên việc xử lý dữ liệu và mở máy rất là nhanh. Bạn sẽ không bao giờ bắt gặp phải tình trạng “100% disk” hay là tràn RAM như trên Windows. Đó là lý do tại sao MacBook luôn mượt mà và là niềm ao ước của rất nhiều người.

    So sánh giao diện sử dụng

    Laptop Windows với hệ điều hành quá phổ biến nhìn chung rất dễ sử dụng.

    Trong khi đó, như đã nói ở trên, macOS khiến một số người khó “làm quen” hơn. Nhưng macOS có giao diện được thiết kế theo phong cách đặc trưng rất hiện đại, tối giản mà sang trọng.

    Tuy nhiên, dù là dùng hệ điều hành nào thì sau một thời gian, người dùng đều sẽ thấy quen thuộc và vấn đề này thường không gây cản trở gì nhiều.

    So sánh hệ sinh thái, kho ứng dụng

    Những chiếc máy tính xách tay chạy Windows nhìn chung có kho ứng dụng và hệ sinh thái dễ tiếp cận, đa dạng nhất vì số lượng người dùng đông đảo và độ phổ biến số 1 của nó.

    Còn MacBook thì dùng hệ sinh thái của Apple nên có hạn chế hơn nhất định. Ví dụ, sẽ có phần mềm mà bạn cần phải tải thêm ứng dụng bên thứ 3 hay “hack” mới có thể dùng được trên MacBook. Nhưng macOS cũng có nhiều thứ độc quyền riêng mà không hệ điều hành nào khác có được. Và chúng có thể phục vụ nhu cầu giải trí, media đầy đủ một cách tiên tiến và chất lượng cao với những ứng dụng của riêng mình.

    So sánh Macbook và laptop Windows 3
    Windows sẽ “dễ dùng” hơn với những ai chưa dùng Mac bao giờ

    So sánh mức độ bảo mật

    So sánh laptop Windows và MacBook là một câu hỏi 9 người 10 ý và khó phân thắng bại. Nhưng có một đặc trưng riêng của MacBook rất thú vị khiến chúng ta được bảo vệ tốt hơn. Đó là nó có thiết kế kiểu cơ khí, tức các bộ phần bên trong máy hoạt động độc lập. Nếu 1 phần nào đó bị virus tấn công, xảy ra lỗi thì cũng không hoặc ít gây hại tới các phần khác.

    Thực tế cho thấy người dùng Windows cũng hay bị virus tấn công máy tính hơn vì sự “dễ tính” của nó. Tuy nhiên, mỗi sản phẩm sẽ có độ bảo mật khác nhau và đời càng mới thì càng có nhiều tính năng hiện đại hơn. Ngoài ra, để bảo mật tốt thì người dùng còn cần sử dụng đến các phần mềm và cẩn trọng khi dùng máy nữa.

    So sánh giá thành

    MacBook nói riêng và các sản phẩm nhà táo cắn dở nói chung được coi là “sang chảnh”, đẳng cấp và luôn thuộc phân khúc cao cấp. Thế nên giá của chúng cũng đắt đỏ hơn khá nhiều so với các hãng khác.

    Tuy nhiên, khi đặt lên bàn cân cùng với những mẫu cao cấp nhất của Dell, Asus,… hay laptop gaming thì MacBook cũng vẫn chỉ ngang ngửa về giá.

    Đặc biệt, hiện nay một laptop i5 văn phòng dùng được cũng có giá khoảng 20 triệu, trong khi đó Macbook Air M1 với sức mạnh và thời lượng sử dụng pin gấp nhiều lần cũng chỉ có giá khoảng 23 triệu.

    Bù lại, khoảng giá của laptop Windows thì vô cùng phong phú từ 7, 8 triệu và cũng có chiếc lên tới 70 triệu như dòng laptop gaming.

    So sánh cổng kết nối

    Về cổng kết nối, dù có tối giản đến đâu thì ít nhất máy Windows cũng sẽ có cổng USB type A truyền thống.

    Nhưng với MacBook đời 2016 trở đi, bạn sẽ không tìm thấy chiếc cổng quen thuộc này nữa.

    Vây nên nếu muốn kết nối với thiết bị dùng cổng này chúng ta phải mua thêm cổng chuyển đổi. Còn về các loại cổng cụ thể như HDMI, jack cắm âm thanh,… thì tùy thuộc vào từng sản phẩm cụ thể nên rất khó so sánh laptop Windows và MacBook máy nào kết nối tốt hơn.

    So sánh khả năng nâng cấp

    Nếu muốn thay linh kiện laptop Windows khi muốn nâng cấp máy hay hỏng hóc thay mới không phải chuyện quá khó khăn. Thậm chí nhiều máy còn dùng được linh kiện của hãng khác mà không nhất định phải là từ cùng 1 hãng sản xuất. Nếu ai thích “độ” máy như dân chơi game, dân công nghệ, dân đồ họa,… thì laptop Windows mới giúp bạn “thỏa sức” thực hiện được.

    Trong khi đó, MacBook hầu như chỉ có thể dùng với thiết bị của cùng hãng Apple sản xuất mà thôi. Nếu kết nối thiết bị từ hãng khác vào thì máy có thể không tương thích, hoặc dùng được cũng không tối ưu.

    So sánh Macbook và laptop Windows 4
    Đừng nghĩ MacBook cao cấp hơn, tốt hơn vì laptop Windows cũng siêu nhiều mẫu “khủng”

    Kết luận: Nên mua MacBook hay laptop Windows?

    Bảng tổng hợp so sánh laptop Windows và Macbook.

    Laptop WindowsMacbook
    Hệ điều hànhWindows, Linux, Ubutun, Google Chrome OS,…macOS
    ChipsetCác dòng chip của Intel (Core i3, Core i5, Core i7,…) và AMDCác dòng chip của Intel (đời cũ) và chip Apple M1, M1 pro, M1 Max
    Hiệu suất máy tínhHiệu suất đa dạngCao
    Giao diện sử dụngĐơn giản dành cho bất kỳ người nàoThiết kế riêng biệt, sang trọng
    Mức độ bảo mậtCần cài nhiều phần mềm để bảo mậtKhá cao
    Giá thànhNhiều phân khúc từ rẻ đến cao, phù hợp với nhiều đối tượngKhá cao, 20 triệu trở lên dành cho phân khúc cao cấp
    Mức độ linh hoạtDùng được linh kiện của nhiều hãng, dễ nâng cấpChỉ dùng được các linh kiện từ Apple, khó nâng cấp

    So sánh laptop Windows và MacBook thì không bao giờ có câu trả lời máy nào tốt hơn vì chiếc máy tốt nhất là sản phẩm phù hợp với bạn nhất. Phù hợp ở đây tính cả về nhu cầu, sở thích lẫn điều kiện tài chính.

    Bạn nên chọn laptop Windows khi:

    • Tìm kiếm 1 chiếc laptop giá tầm trung hoặc trung bình, không đắt hơn 30 triệu đồng
    • Là dân công nghệ thích vọc vạch, độ máy, nâng cấp máy
    • Là dân chơi game hay thích sử dụng thiết bị từ các hãng đa dạng
    • Không có nhu cầu dùng máy tính quá đắt

    Bạn nên chọn MacBook khi:

    • Yêu thích vẻ hiện đại, sang chảnh, thời thượng, đặc trưng rất riêng của Apple
    • Thích laptop mỏng nhẹ, nhỏ gọn, dễ dàng linh động
    • Yêu thích hệ sinh thái Apple
    • Người đang dùng nhiều sản phẩm Apple khác như iPhone, iPad, Mac,… để kết nối dễ dàng

    Sau khi so sánh laptop Windows và MacBook, bạn cảm thấy đâu mới là sản phẩm phù hợp với mình?
  • 8 Cách mở Task Manager trên Windows

    8 Cách mở Task Manager trên Windows

    8 Cách mở Task Manager trên Windows

    1. Cách mở Task Manager trên Windows từ thanh Taskbar

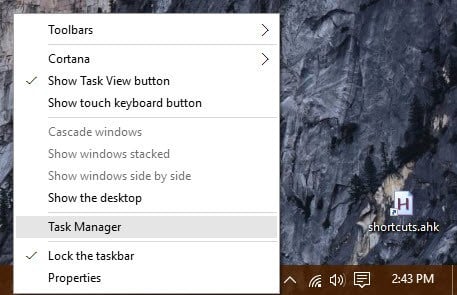
    Trên Windows 10, Windows 8, Windows 7, bạn kích chuột phải vào Taskbar chọn Task Manager để mở Windows Task Manager.

    8 Cách mở Task Manager trên Windows 5

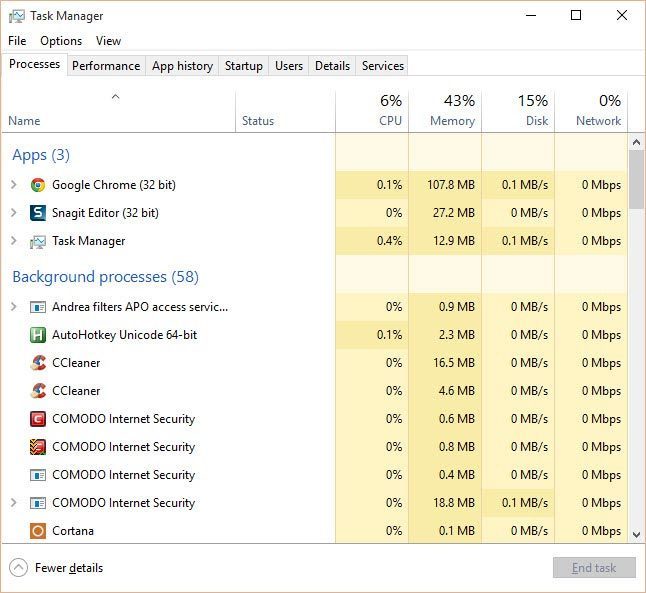
    Lúc này cửa sổ chương trình Windows Task Manager sẽ hiện lên:

    Cách mở Task Manager trên Windows
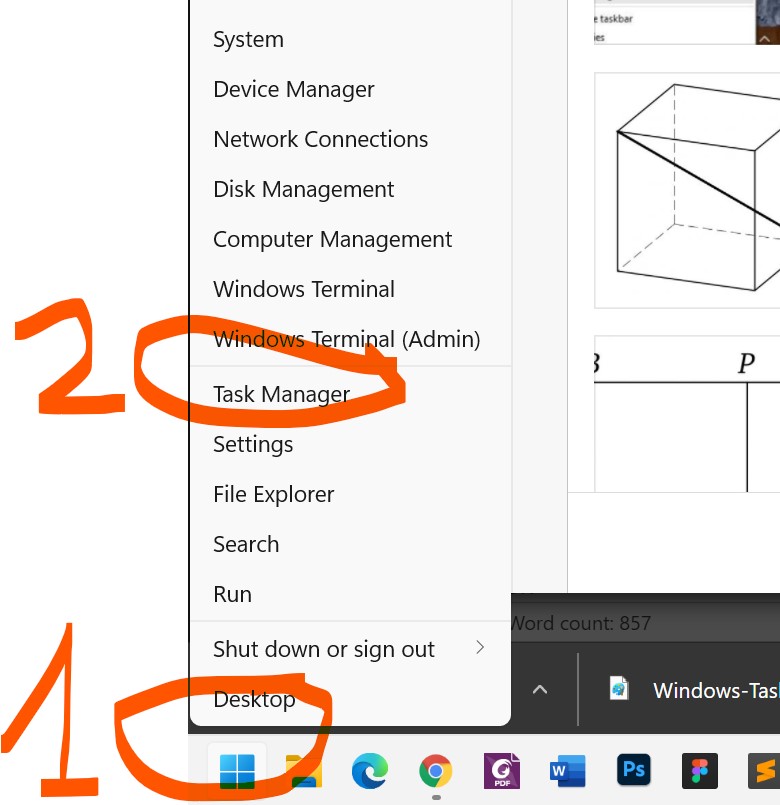
    Trên Windows 11, bạn phải bấm phải chuột vào biểu tượng Windows (Nút Start ở góc dưới bên trái màn hình) hoặc tổ hợp phím Win + X. Sau đó chọn Task Manager.
    Cách mở task manager trên windows 11

    2. Sử dụng phím tắt

    • Nhấn tổ hợp phím Ctrl + Shift + Esc, trên màn hình sẽ hiển thị giao diện Task Manager.

    3. Sử dụng lệnh taskmgr

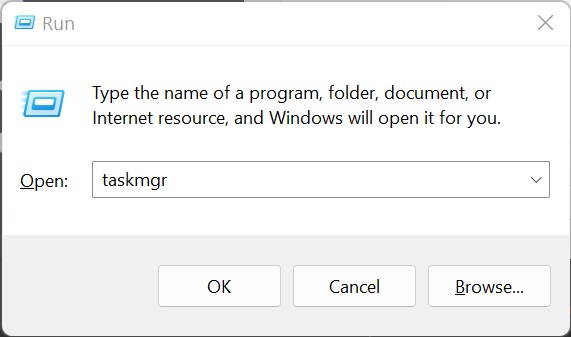
    • Bạn mở hộp thoại Run của Windows bằng cách bấm Win + R hoặc vào Start và gõ Run để tìm kiếm.
    • Khi hộp thoại Run hiện lên, bạn nhập lệnh taskmgr, sau đó bấm Enter.

    hop thoai run cua windows

    4. Sử dụng Command Prompt

    Bạn có thể sử dụng lệnh Command Prompt để mở Task Manager.

    • Đầu tiên bạn nhấn tổ hợp phím Win + X sau đó chọn Command Prompt. Nếu máy tính của bạn chạy hệ điều hành Windows 7, bạn có thể tìm kiếm lệnh Command Prompt trên Menu Start. Hoặc có thể bấm Win + R và nhập cmd, sau đó bấm Enter.

    8 Cách mở Task Manager trên Windows 6

    • Sau khi cửa sổ Command Prompt xuất hiện, bạn nhập câu lệnh taskmgr vào cửa sổ Command Prompt rồi nhấn Enter để mở Task Manager:

    8 Cách mở Task Manager trên Windows 7

    Ngoài ra nếu muốn bạn có thể mở Task Manager dưới quyền Admin. Các bước thực hiện tương tự như trên, nhưng bạn chọn tùy chọn Command Prompt (Admin) thay vì chọn Command Prompt.

    5. Mở Task Manager từ File Explorer

    Trên Windows, Task Manager là một ứng dụng riêng biệt được tích hợp trên Windows. Do đó bạn có thể mở Task Manager từ Windows File Explorer.

    • Đầu tiên bạn mở File Explorer bằng cách nhấn tổ hợp phím Win + E.
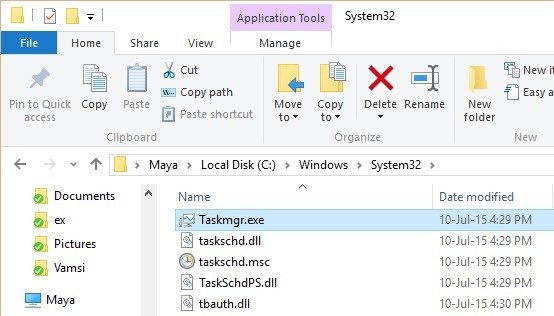
    • Sau khi mở File Explorer, bạn tìm đến thư mục C:\Windows\System32
    • Tìm ứng dụng Taskmgr.exe, sau đó kích đúp chuột vào đó để mở Task Manager.

    8 Cách mở Task Manager trên Windows 8

    • Nếu muốn mở Task Manager dưới quyền Admin, bạn kích chuột phải vào ứng dụng rồi chọn Run As Administrator.

    6. Sử dụng tổ hợp phím Ctrl + Alt + Del

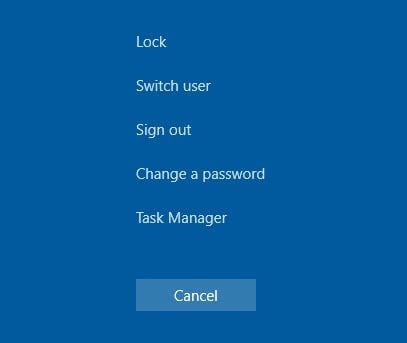
    • Đầu tiên bạn nhấn tổ hợp phím Ctrl + Alt + Del. Sau khi giao diện bảo mật xuất hiện, bạn chọn tùy chọn Task Manager để mở Task Manager.

    8 Cách mở Task Manager trên Windows 9

    7. Mở Task Manager từ Windows Search Box

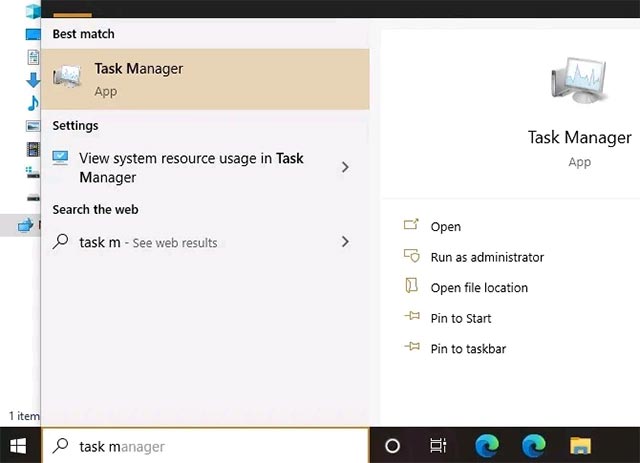
    • Từ hộp tìm kiếm hệ thống của Windows 10 (cũng là menu Start của Windows 7), bạn chỉ cần nhập từ khóa “task manager” và nhấp vào mục tương ứng trong kết quả trả về.

    8 Cách mở Task Manager trên Windows 10

    8. Mở Task Manager từ Control Panel

    • Truy cập Control Panel từ menu Start hoặc File Explorer.
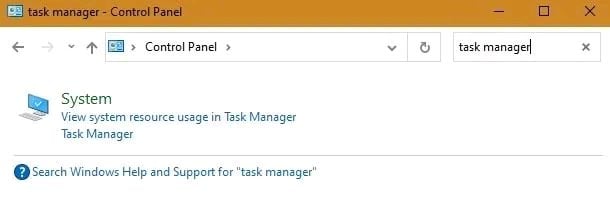
    • Khi cửa sổ Control Panel mở ra, bạn điều hướng đến thanh tìm kiếm ở đầu màn hình, nhập từ khóa “task manager” và nhấn Enter. Thao tác này sẽ mở Task Manager từ tài nguyên hệ thống.

    8 Cách mở Task Manager trên Windows 11

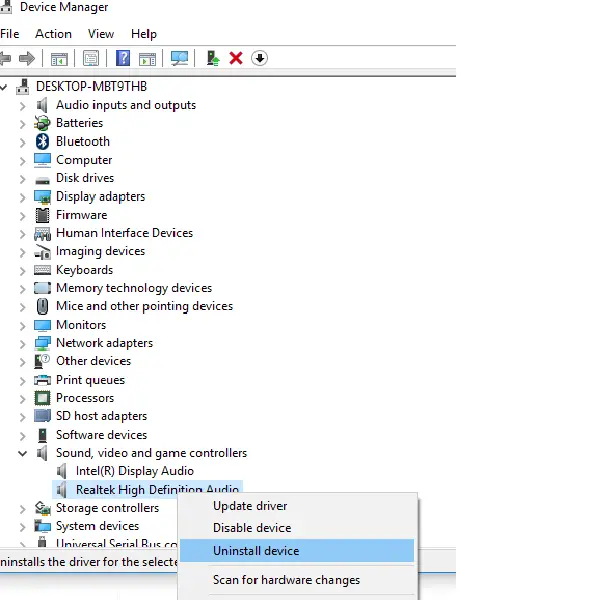
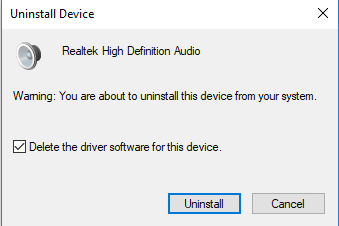
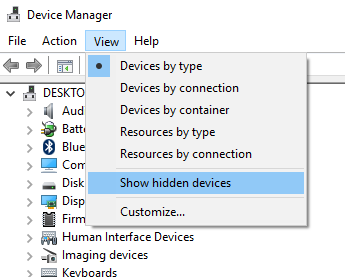
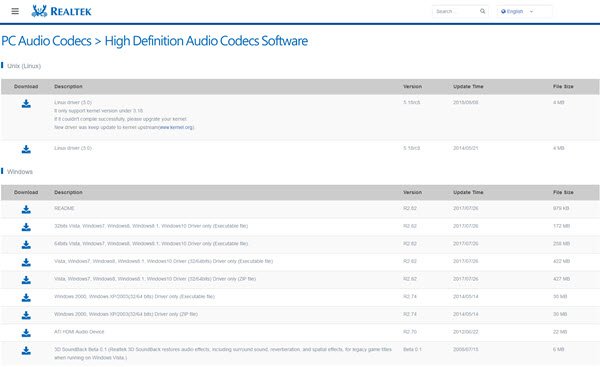
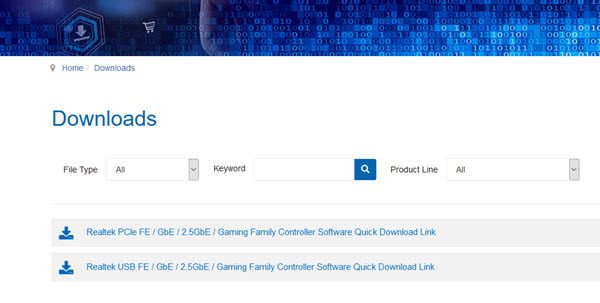
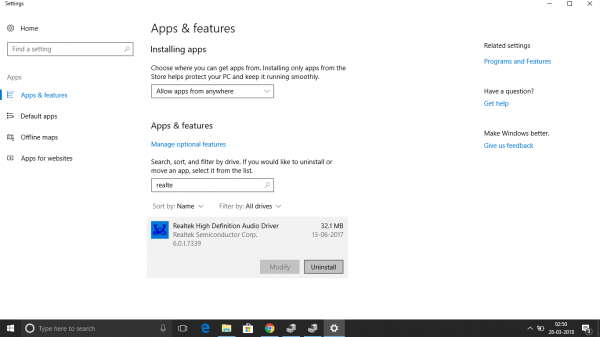
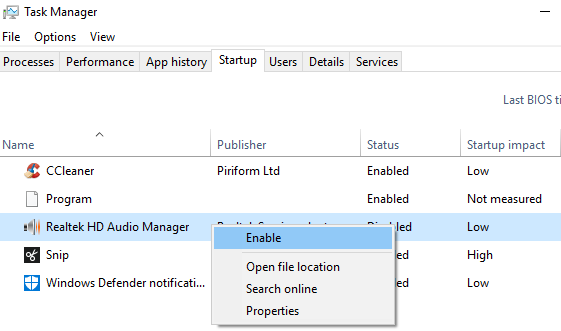
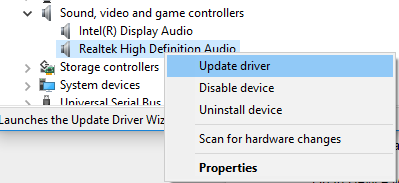
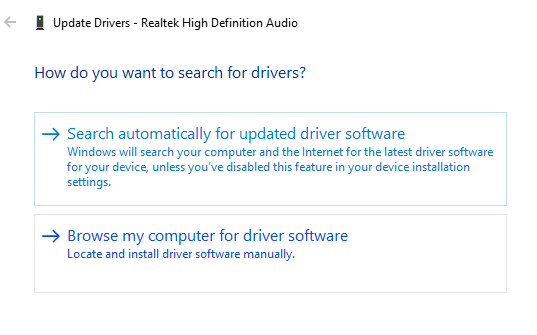
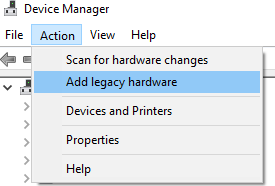
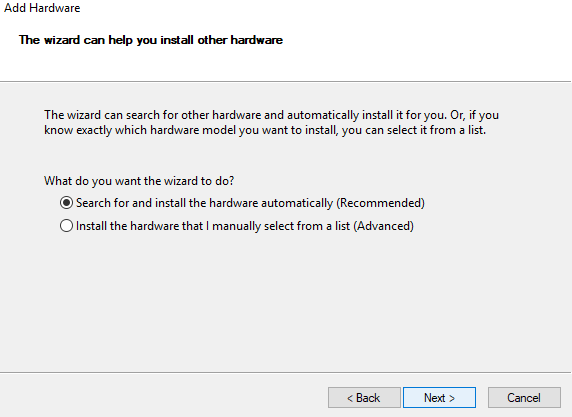
  • How to download and reinstall Realtek HD Audio Manager in Windows 10

    How to download and reinstall Realtek HD Audio Manager in Windows 10

    How to download and reinstall Realtek HD Audio Manager in Windows 10

  • Download offline app from Microsoft Store (install windows 10 store app manually)

    Download offline app from Microsoft Store (install windows 10 store app manually)

    Download offline app from Microsoft Store (install windows 10 store app manually)

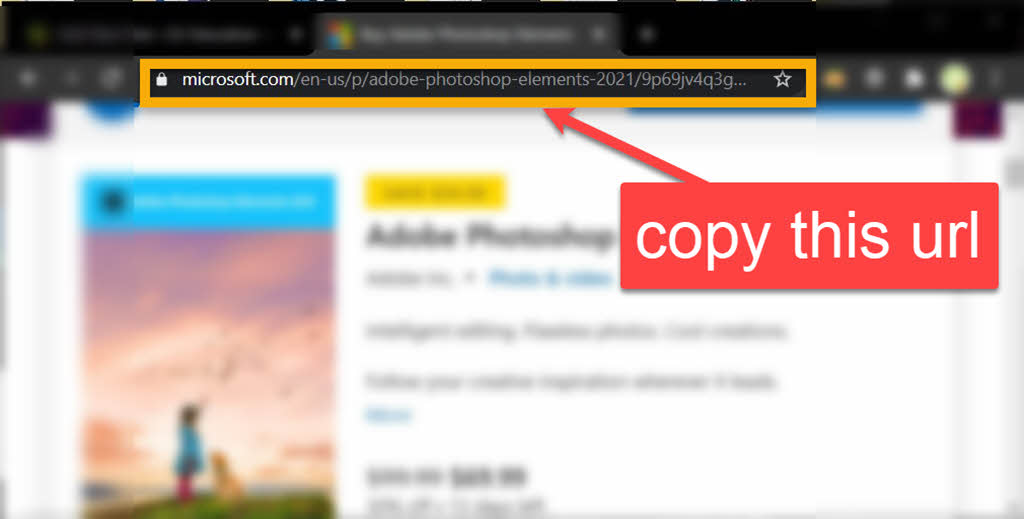
    You can install windows 10 store app manually (app installer windows 10 download offline, download windows 10 apps without store) by doing these steps:

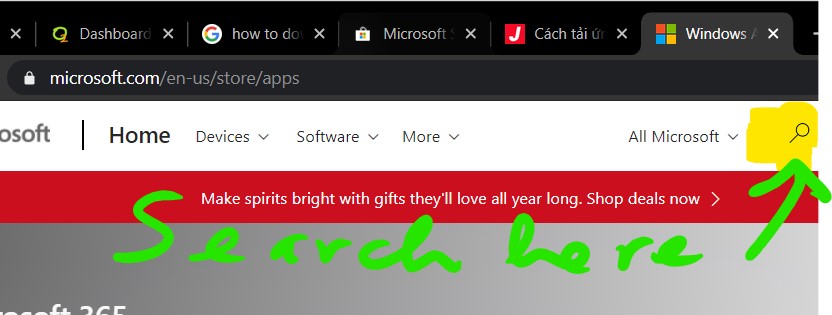
    1. go to https://www.microsoft.com/en-us/store/apps then search your apphow to download offline app from microsoft store
    2. copy the url of your app you want to installhow to download offline app from windows 10 store
    3. go to this url: https://store.rg-adguard.net
    4. paste your url (you just copied) in the textfield then click ✔
    5. download offline app from microsoft store
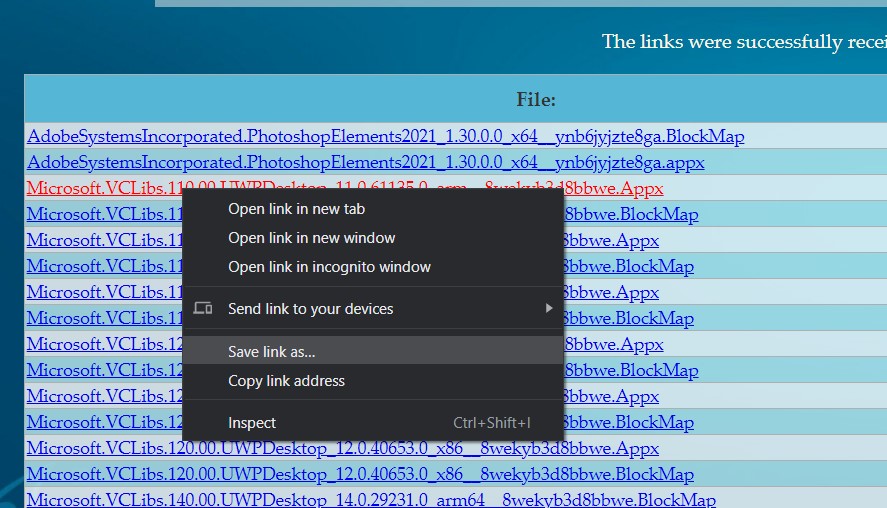
    6. Right click on the file with file extension .appx or .appxbundle then click Save link as... then choose location to save your app.download offline app from windows 10 store
  • How to take a screenshot on Windows 10

    How to take a screenshot on Windows 10

    How to take a screenshot on Windows 10

    Take a screenshot on Windows 10 (Copy the window or screen contents). When using Office programs with Windows, there are two ways to copy the contents of what you see on your screen (commonly referred to as a “screen shot” or “screen capture”). You can use the Snipping Tool or the PRINT SCREEN key.

    #1. Using the Snipping Tool to Take a screenshot on Windows 10

    The Windows Snipping Tool captures all or part of your PC screen. After you capture a snip, it’s automatically copied to the Snipping Tool window. From there you can edit, save, or share the snip.

    Use Snipping Tool to capture screenshots on Windows 10, Windows 8.1, Windows 7

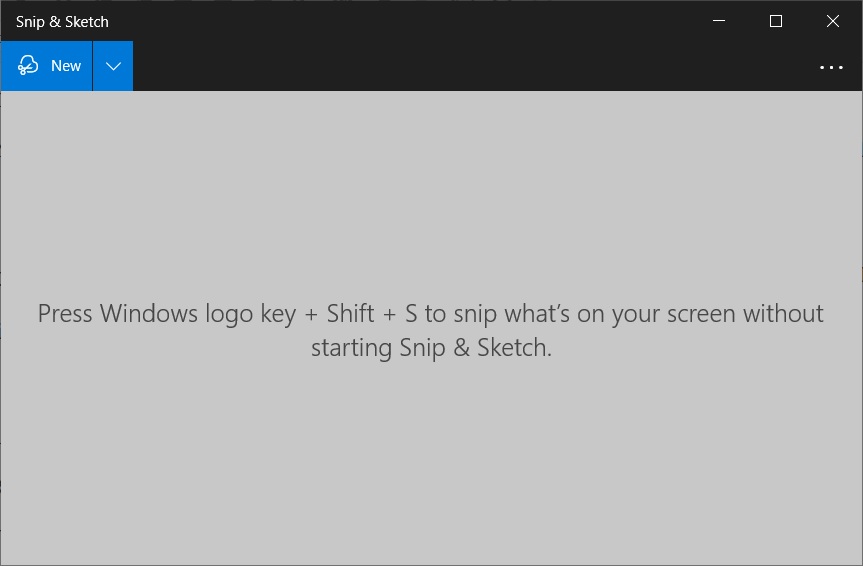
    Take a snapshot to copy words or images from all or part of your PC screen. Use Snipping Tool to make changes or notes, then save, and share.Windows 10 has another screenshot app you might also like to try. When you open Snipping Tool, you’ll see an invitation and keyboard shortcut to Snip & Sketch.

    take a screenshoot

    Capture any of the following types of snips:

    Free-form snip Draw a free-form shape around an object.
    Rectangular snip Drag the cursor around an object to form a rectangle.
    Window snip Select a window, such as a dialog box, that you want to capture.
    Full-screen snip Capture the entire screen.

    When you capture a snip, it’s automatically copied to the Snipping Tool window where you make changes, save, and share.

    #2. Using the PRINT SCREEN key

    Pressing PRINT SCREEN captures an image of your entire screen and copies it to the Clipboard in your computer’s memory. You can then paste (CTRL+V) the image into a document, email message, or other file.

    Where is the PRINT SCREEN button?

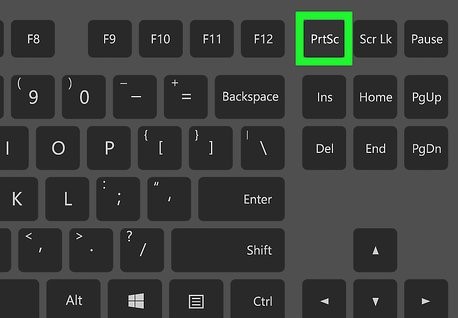
    The PRINT SCREEN key is usually located in the upper right corner of your keyboard. The key looks similar to the following:

    how to take a screenshot

    The text you see on your keyboard might be PrtSc, PrtScn, or PrntScrn. The other text on the Print Screen key is usually SysRq.

    Copy only the image of the active window

    The active window is the window that you are currently working in. Only one window can be active at a time.

      1. Click the window that you want to copy.
      2. Press ALT+PRINT SCREEN.
      3. Paste (CTRL+V) the image into an Office program or other application.

    Copy the entire image on the screen

    1. Open everything you want to copy and position it the way you want.
    2. Press PRINT SCREEN.
    3. Paste (CTRL+V) the image into an Office program or other application.

    Modify the image

    • Paste (CTRL+V) the image into a drawing application, such as Microsoft Paint, and by using the tools available in your drawing application, you can add circles around text or images you want to highlight or crop anything that you don’t want to appear in the image.

      For more complex modifications, it is recommended that you use the Snipping Tool to capture your screen shot.

  • 30 windows shortcuts keyboard must know

    30 windows shortcuts keyboard must know

    30 windows shortcuts keyboard must to know

    Keyboard shortcuts are keys or combinations of keys that provide an alternative way to do something that you’d typically do with a mouse.

    See more: Realtek Audio Console Download

    Basic Windows keyboard shortcuts

    • Ctrl+Z: Undo. No matter what program you’re running, Ctrl+Z will roll back your last action. Whether you’ve just overwritten an entire paragraph in Microsoft Word or deleted a file you didn’t mean to, this one is an absolute lifesaver.
    • Ctrl+A: Select all. This command lets you highlight all the text in a document or select all the files in a folder. Hitting Ctrl+A can save you time you’d otherwise spend clicking and dragging your mouse.
    • Ctrl + X: Cut the selected item.
    • Ctrl + C (or Ctrl + Insert): Copy the selected item.
    • Ctrl + V (or Shift + Insert): Paste the selected item.
    • Windows logo key  + L: Lock your PC.
    • F2: Rename the selected item. Simply highlight a file and hit F2 to give it a new name. This command also lets you edit text in other programs—tap F2 in Microsoft Excel, for example, and you’ll be able to edit the contents of the cell you’re in.
    • F3: Search for a file or folder in File Explorer.
    • F4: Display the address bar list in File Explorer.
    • F5: Refresh the active window. While you’re exploring the function key row, take a look at F5. This key will refresh a page—a good trick when you’re using File Explorer or your web browser. After the refresh, you’ll see the latest version of the page you’re viewing.
    • PrtScn: Take a screenshot of your whole screen and copy it to the clipboard.

    You can change this shortcut so it also opens  screen snipping, which lets you edit your screenshot. Select Start  Settings Ease of Access Keyboard, and turn on the toggle under Print Screen shortcut.  Use PrtScn key to open screen snipping

    windows shortcuts, windows keyboard shortcut

    Windows navigation shortcuts

    • Win+D: Show or hide the desktop. This keyboard combo minimizes all your open windows, bringing your home screen into view. If you store rows and rows of files and shortcuts on your desktop, Win+D will let you access them in in moments.
    • Win+left arrow or Win+right arrow: Snap windows. Snapping a window simply opens it on one side of the screen (left or right, depending on which arrow you hit). This allows you to compare two windows side-by-side and keeps your workspace organized.
    • Win+Tab: Open the Task view. Like Alt+Tab, this shortcut lets you switch apps, but it does so by opening an updated Windows application switcher. The latest version shows thumbnails of all your open programs on the screen.
    • Tab and Shift+Tab: Move backward and forward through options. When you open a dialog box, these commands move you forward (Tab) or backward (Shift+Tab) through the available options, saving you a click. If you’re dealing with a dialog box that has multiple tabs, hit Ctrl+Tab or Ctrl+Shift+Tab to navigate through them.
    • Ctrl+Esc: Open the Start menu. If you’re using a keyboard that doesn’t have a Windows key, this shortcut will open the Start menu. Otherwise, a quick tap of the Windows key will do the same thing. From there, you can stay on the keyboard and navigate the Start menu with the cursor keys, Tab, and Shift+Tab.
    • Alt + Esc: Cycle through items in the order in which they were opened.
    • Alt + Left arrow: Go back.
    • Alt+Tab: Switch apps. This baby is one of the classic Windows shortcuts, and it can be hugely useful when you’re running multiple applications. Just press Alt+Tab and you’ll be able to quickly flick through all your open windows.
    • Alt+F4: Close apps. Another old-school shortcut, Alt+F4 shuts down active apps so you can skip the process of hunting down their on-screen menus. Don’t worry about losing unsaved work with this command—it will prompt you to save your documents before closing them.

    Advanced Windows shortcut tricks

    • Windows logo key + R: Open the Run dialog box.
    • Windows logo key + P. Choose a presentation display mode.
    • Windows logo key + period (.) or semicolon (;):  Open emoji panel.
    • Win+I: Open Settings. Any time you want to configure the way Windows works, hit this keyboard shortcut to bring up the Settings dialog. Alternatively, use Win+A to open up the Action Center panel, which shows notifications and provides quick access to certain settings.
    • Win+S: Search Windows. The Windows taskbar has a handy search box that lets you quiz Cortana or sift through your applications and saved files. Jump straight to it with this keyboard shortcut, then type in your search terms.
    • Win+PrtScn: Save a screenshot. No need to open a dedicated screenshot tool: Win+PrtScn grabs the whole screen and saves it as a PNG file in a Screenshots folder inside your Pictures folder. At the same time, Windows will also copy the image to the clipboard. If you don’t want to snap the whole screen, the Alt+PrtScn combination will take a screenshot of just the active window, but it will only copy this image to the clipboard, so you won’t get a saved file.
    • Ctrl+Shift+Esc: Open the Task Manager. The Task Manager is your window into everything running on your Windows system, from the open programs to the background processes. This shortcut will call up the Task Manager, no matter what application you’re using.
    • Win+C: Start talking to Cortana. This shortcut puts Cortana in listening mode, but you must activate it before you can give it a whirl. To do so, open Cortana from the taskbar search box, click the cog icon, and turn on the keyboard shortcut. Once you’ve enabled the shortcut, hit the Win+C whenever you want to talk to the digital assistant. You can do this instead of, or in addition to, saying, “Hey Cortana.”
    • Win+Ctrl+D: Add a new virtual desktop. Virtual desktops create secondary screens where you can stash some of your open applications and windows, giving you extra workspace. This shortcut lets you create one. Once you have, click the Task View button to the right of the taskbar search box to switch from one desktop to another. Or stick with shortcuts: Win+Ctrl+arrow will cycle through your open desktops, and Win+Ctrl+F4 will close whichever one you’re currently viewing and shift your open windows and apps to the next available virtual desktop.

    You can see more Windows Shortcuts here.