Category: LẬP TRÌNH

  • Download offline app from Microsoft Store (install windows 10 store app manually)

    Download offline app from Microsoft Store (install windows 10 store app manually)

    Download offline app from Microsoft Store (install windows 10 store app manually)

    You can install windows 10 store app manually (app installer windows 10 download offline, download windows 10 apps without store) by doing these steps:

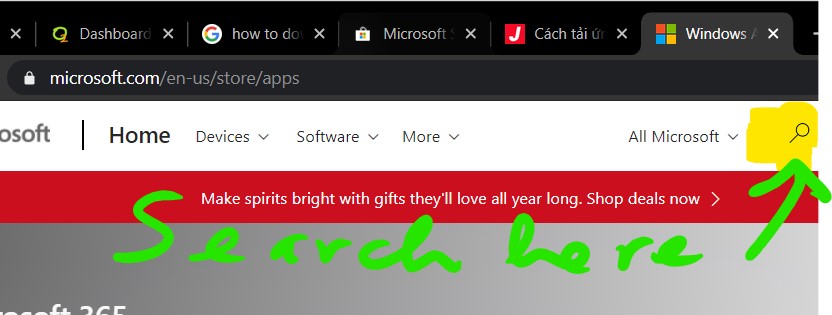
    1. go to https://www.microsoft.com/en-us/store/apps then search your apphow to download offline app from microsoft store
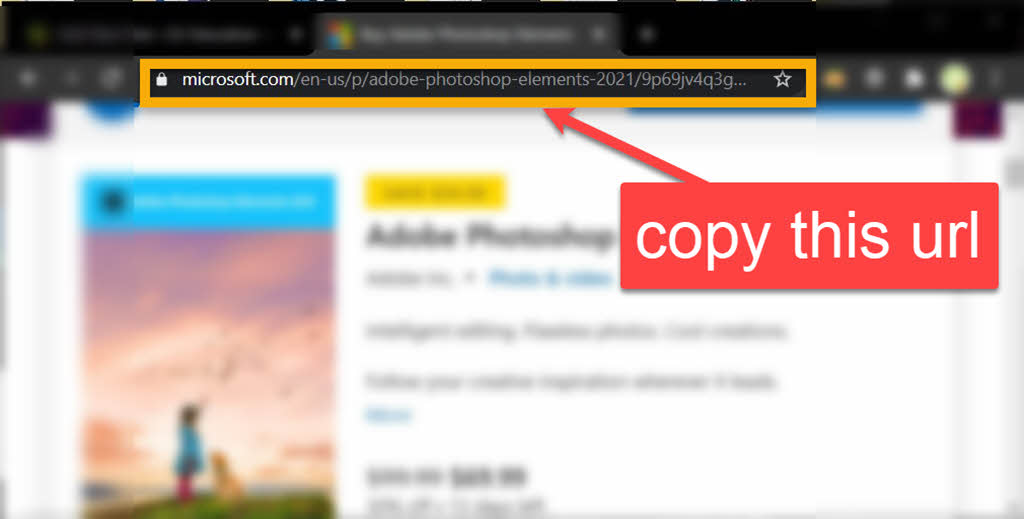
    2. copy the url of your app you want to installhow to download offline app from windows 10 store
    3. go to this url: https://store.rg-adguard.net
    4. paste your url (you just copied) in the textfield then click ✔
    5. download offline app from microsoft store
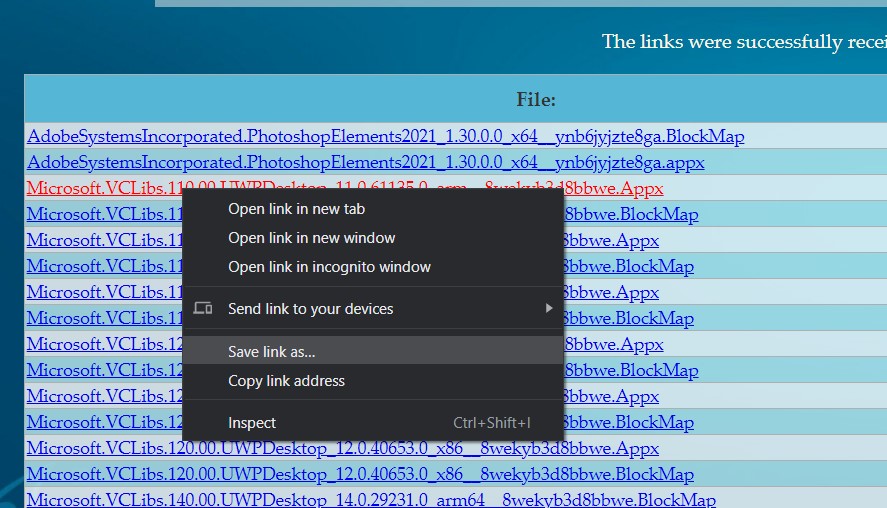
    6. Right click on the file with file extension .appx or .appxbundle then click Save link as... then choose location to save your app.download offline app from windows 10 store
  • Python Arrays – Python Lists

    Python Arrays – Python Lists

    Python Arrays – Python Lists

    Does python have an array?

    • Arrays are used to store multiple values in one single variable.
    • Python does not have built-in support for Arrays, but Python Lists can be used instead.

    What is Python Lists/Python Arrays?

    Python Lists are used to store multiple items in a single variable. For example, fruits_list has 4 items apple, banana, cherry, orange

    fruits_list = ["apple", "banana", "cherry", "orange"]

    Lists are one of 4 built-in data types in Python used to store collections of data, the other 3 are Tuple, Set, and Dictionary, all with different qualities and usage.

    Lists are created using square brackets []

    Python List/Array Methods

    Python has a set of built-in methods that you can use on lists/arrays.

    Method Description
    append() Adds an element at the end of the list
    clear() Removes all the elements from the list
    copy() Returns a copy of the list
    count() Returns the number of elements with the specified value
    extend() Add the elements of a list (or any iterable), to the end of the current list
    index() Returns the index of the first element with the specified value
    insert() Adds an element at the specified position
    pop() Removes the element at the specified position
    remove() Removes the first item with the specified value
    reverse() Reverses the order of the list
    sort() Sorts the list

    Python Lists/Python Arrays Items

    • List items are ordered, changeable, and allow duplicate values.
    • List items are indexed, the first item has index [0], the second item has index [1] etc. For example, fruits_list = ["apple", "banana", "cherry", "orange"] then fruits_list[0]="apple", fruits_list[1]=banana

    Ordered

    • When we say that lists are ordered, it means that the items have a defined order, and that order will not change.
    • If you add new items to a list, the new items will be placed at the end of the list.
    • Note: There are some list methods that will change the order, but in general: the order of the items will not change.
    • Changeable
    • The list is changeable, meaning that we can change, add, and remove items in a list after it has been created.

    Python List Items Allow Duplicates

    • Since lists are indexed, lists can have items with the same value:
    • Example

    fruits_list = ["apple", "banana", "cherry", "apple", "cherry"]


    Python List Length

    • To determine how many items a list has, use the len() function:

    Example

    Print the number of items in the list:

    fruits_list = ["apple", "banana", "cherry", "apple", "cherry"]
    len(fruits_list)

    List Items – Data Types

    • List items can be of any data type.

    Example: String, int and boolean data types:

    list1 = ["apple", "banana", "cherry"]
    list2 = [1, 5, 7, 9, 3]
    list3 = [True, False, False]
    • A list can contain different data types:

    Example: A list with strings, integers and boolean values:

    my_list = ["abc", 34, True, 40, "male"]

    type()

    • From Python’s perspective, lists are defined as objects with the data type ‘list’:
    • <class ‘list’>
    • Example: What is the data type of a list?

    mylist = ["apple", "banana", "cherry"]
    print(type(mylist))

    The list() Constructor

    • It is also possible to use the list() constructor when creating a new list.
    • Example

      Using the list() constructor to make a List:

      thislist = list(("apple", "banana", "cherry")) # note the double round-brackets
      print(thislist)

    Python List of Lists (Python List in list)

    A list of lists in Python is a list object where each list element is a list by itself. Create a list of list in Python by using the square bracket notation to create a nested list [[1, 2, 3], [4, 5, 6], [7, 8, 9]].

    Create a List of Lists in Python

    Create a list of lists by using the square bracket notation. For example, to create a list of lists of integer values, use [[1, 2], [3, 4]]. Each list element of the outer list is a nested list itself.

    Convert List of Lists to One List

    Say, you want to convert a list of lists [[1, 2], [3, 4]] into a single list [1, 2, 3, 4]. How to achieve this? There are different options:

    • List comprehension [x for l in lst for x in l] assuming you have a list of lists lst.
    • Unpacking [*lst[0], *lst[1]] assuming you have a list of two lists lst.
    • Using the extend() method of Python lists to extend all lists in the list of lists.

    Find examples of all three methods in the following code snippet:

    lst = [[1, 2], [3, 4]]
    
    # Method 1: List Comprehension
    flat_1 = [x for l in lst for x in l]
    
    # Method 2: Unpacking
    flat_2 = [*lst[0], *lst[1]]
    
    # Method 3: Extend Method
    flat_3 = []
    for l in lst:
    flat_3.extend(l)
    
    ## Check results:
    print(flat_1)
    # [1, 2, 3, 4]
    
    print(flat_2)
    # [1, 2, 3, 4]
    
    print(flat_3)
    # [1, 2, 3, 4]

    Due its simplicity and efficiency, the first list comprehension method is superior to the other two methods.
  • Python Get input from Console

    Python Get input from Console

    Python Get input from Console

    How to prompt for user input and read command-line arguments. Python user input from the keyboard can be read using the input() built-in function. The input from the user is read as a string and can be assigned to a variable. After entering the value from the keyboard, we have to press the “Enter” button. Then the input() function reads the value entered by the user.

    See more:

    1. What is Console in Python?

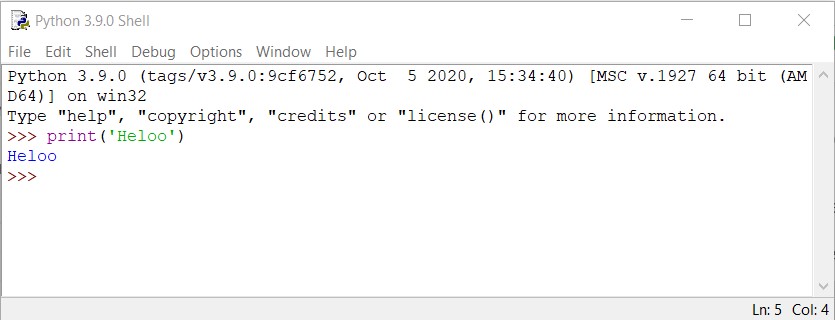
    Console (also called Shell) is basically a command-line interpreter that takes input from the user i.e one command at a time and interprets it. If it is error free then it runs the command and gives required output otherwise shows the error message. A Python Console looks like this.

    python get input from console

    2. Python Get input from Console

    To read user input you can try the cmd module for easily creating a mini-command line interpreter (with help texts and autocompletion) and raw_input (input for Python 3+) for reading a line of text from the user.

    text = raw_input("prompt") # Python 2 
    text = input("prompt") # Python 3

    There are two modules for parsing command line options: optparse (deprecated since Python 2.7, use argparse instead) and getopt. If you just want to input files to your script, behold the power of fileinput.

    Note that, raw_input is no longer available in Python 3.x. But raw_input was renamed input, so the same functionality exists.

    3. String and Numeric input

    The input() function, by default, will convert all the information it receives into a string.  Numbers, on the other hand, need to be explicitly handled as such since they come in as strings originally.

    To converts the string into a integer, you can use int()function. Converts the string into decimal format, use float()function.

    user_input1 = input ("Enter a integer number: ")
    int_number = int(user_input1)
    print ("The number you entered is: ", input_number)
    
    user_input2 = input ("Enter a decimal number: ") 
    float_number = float(user_input2)
    print ("The number you entered is: ", float_number)

    Another way to do the same thing is as follows:

    int_number = int(input ("Enter a integer number: "))
    print ("The number you entered is: ", input_number)
    
    float_number = float(input ("Enter a decimal number: "))
    print ("The number you entered is: ", float_number)
  • Python Swap Two Variables

    Python Swap Two Variables

    Python Swap Two Variables

    In computer programming, swapping two variables specifies the mutual exchange of values of the variables. It is generally done by using a temporary variable.

    See more: Python Solve Quadratic Equation

    For example, before swapping: var_1 = 1  and var_2 = 5. After swapping, var_1 = 5 and var_2 = 1.

    Python Swap Two Variables Using Temporary Variable

    We use a temporary variable temp to store the value of var_1, then assign the value of var_2 to var_1. Finally, we assign the value of temp to var_2.

    var_1 = input('The fisrt variable = ')
    var_2 = input('The second variable = ')
    
    temp = var_1
    var_1 = var_2
    var_2 = temp
    
    print(var_1, var_2)
    
    input()

    Python Swap Two Variables Using Assign Multiple Variables

    var_1 = input('The fisrt variable = ')
    var_2 = input('The second variable = ')
    
    var_1, var_2 = var_2, var_1
    
    print(var_1, var_2)
    
    input()

    Python Swap Two Numbers Without Using a Temporary Variable

    When the type of two variable is number (integer, float…) we can swap them without using a temporary variable.

    var_1 = float(input('The fisrt variable = '))
    var_2 = float(input('The second variable = '))
    
    var_1 = var_1 + var_2
    var_2 = var_1 - var_2
    var_1 = var_1 - var_2
    
    print(var_1, var_2)
    input()


  • Python Solve Quadratic Equation

    Python Solve Quadratic Equation

    Python Solve Quadratic Equation

    Given a quadratic equation the task is solve the equation or find out the roots of the equation. Standard form of quadratic equation is $$ax^2+ bx + c =0$$ where, $a, b$, and $c$ are coefficient and real numbers and also $a \ne 0$ 0. If $a$ is equal to $0$ that equation is not valid quadratic equation.

    See more: Hướng dẫn lập trình Python – Python Guide

    1. Python Solve Quadratic Equation Using the Direct Formula

    Using the below quadratic formula we can find the root of the quadratic equation.

    Let $\Delta =b^2-4ac$, then:

    • If $b^2 – 4ac<0$, then roots are complex (not real).
    • If $b^2 – 4ac=0$, then roots are real and both roots are same $x=\frac{-b}{2a}$.
    • If $b^2 – 4ac>0$, then roots are real and different $$ x=\frac{-b\pm\sqrt{b^2-4ac}}{2a}.$$
    # Python program to find roots of quadratic equation 
    import math 
    
    
    # function for finding roots 
    def equationroots(): 
    
       a = float(input('Enter coefficient a: '))
       while a == 0:
          print("Coefficient a can not equal 0")
          a = float(input('Enter coefficient a: '))
       b = float(input('Enter coefficient b: '))
       c = float(input('Enter coefficient c: '))
       
       # calculating dcriminant using formula 
       d = b * b - 4 * a * c 
       
       # checking condition for dcriminant 
       if d > 0: 
          print("Your equation has real and different roots:") 
          print((-b + math.sqrt(d))/(2 * a)) 
          print((-b - math.sqrt(d))/(2 * a)) 
       
       elif d == 0: 
          print("Your equation has real and same roots:") 
          print(-b / (2 * a)) 
       
       # when dcriminant is less than 0 
       else: 
          print("Your equation has complex roots:") 
          print(- b / (2 * a), " +", math.sqrt(-d),'i') 
          print(- b / (2 * a), " -", math.sqrt(-d),'i') 
    
    
    equationroots() 
    

    2. Python Solve Quadratic Equation Using the Complex Math Module

    First, we have to calculate the discriminant and then find two solution of quadratic equation using cmath module.

    cmath module — Mathematical functions for complex numbers — provides access to mathematical functions for complex numbers. The functions in this module accept integers, floating-point numbers or complex numbers as arguments. They will also accept any Python object that has either a __complex__() or a __float__() method: these methods are used to convert the object to a complex or floating-point number, respectively, and the function is then applied to the result of the conversion.

    # Python program to find roots of quadratic equation 
    import cmath 
    
    
    # function for finding roots 
    def equationroots(): 
    
       a = float(input('Enter coefficient a: '))
       while a == 0:
          print("Coefficient a can not equal 0")
          a = float(input('Enter coefficient a: '))
       b = float(input('Enter coefficient b: '))
       c = float(input('Enter coefficient c: '))
       
       # calculating dcriminant using formula 
       d = b * b - 4 * a * c 
       
       if d == 0: 
          print("Your equation has real and same roots:") 
          print(-b / (2 * a)) 
       
       # when dcriminant is not equal 0 
       else: 
          print("Your equation has complex roots:") 
          print(- b / (2 * a), " +", cmath.sqrt(d)) 
          print(- b / (2 * a), " -", cmath.sqrt(d)) 
    
    
    equationroots() 
    
    input()


  • CPC Adsense là gì? CPC nước nào cao nhất?

    CPC Adsense là gì? CPC nước nào cao nhất?

    CPC Adsense là gì? CPC nước nào cao nhất?

    1. CPC Adsense là gì?

    CPC là viết tắt của Cost per Click: giá mỗi lần nhấp chuột. Đây là số tiền bạn kiếm được mỗi lần người dùng nhấp chuột vào quảng cáo (website, video Youtube) của bạn do Google trả cho chúng ta. Giá CPC do nhà quảng cáo xác định dựa trên thứ mà họ quảng cáo. CPC khác nhau ở từng khu vực và tùy từng nội dung quảng cáo, CPC càng cao thì số tiền bạn kiếm được càng nhiều.

    2. CPC nước nào cao nhất?

    Khi bạn chơi Google Adsense thì cần quan tâm tới CPC của nước nào cao nhất. Câu trả lời đó là Úc (Australia). Dưới đây là  bảng xếp hạng CPC theo từng quốc gia trong Google AdSense

    STT Quốc gia Adsense CPC STT Quốc gia Adsense CPC
    1 Australia $0.48 41 Peru $0.08
    2 Netherlands Antilles $0.44 42 Malaysia $0.08
    3 Denmark $0.43 43 Lithuania $0.08
    4 Switzerland $0.41 44 Hungary $0.08
    5 South Africa $0.36 45 Bangladesh $0.08
    6 New Zealand $0.32 46 Saudi Arabia $0.07
    7 Finland $0.32 47 Oman $0.07
    8 Singapore $0.30 48 Israel $0.07
    9 Norway $0.28 49 Egypt $0.07
    10 United Kingdom $0.27 50 United Arab Emirates $0.06
    11 Netherlands $0.26 51 Turkey $0.06
    12 Germany $0.26 52 Slovenia $0.06
    13 United States $0.25 53 Georgia $0.06
    14 Canada $0.24 54 Argentina $0.06
    15 Austria $0.23 55 Thailand $0.05
    16 Barbados $0.22 56 Sri Lanka $0.05
    17 Ireland $0.21 57 South Korea $0.05
    18 Belgium $0.21 58 Russia $0.05
    19 France $0.20 59 Romania $0.05
    20 Sweden $0.19 60 Philippines $0.05
    21 Taiwan $0.18 61 Mauritius $0.05
    22 Kenya $0.18 62 India $0.05
    23 Trinidad and Tobago $0.17 63 Colombia $0.05
    24 Greece $0.17 64 China $0.05
    25 Chile $0.17 65 Ukraine $0.04
    26 Qatar $0.15 66 Tunisia $0.04
    27 Croatia $0.14 67 Mozambique $0.04
    28 Italy $0.13 68 Jordan $0.04
    29 Puerto Rico $0.12 69 Indonesia $0.04
    30 Spain $0.11 70 Fiji $0.04
    31 Poland $0.11 71 Albania $0.04
    32 Nigeria $0.11 72 Vietnam $0.03
    33 Malta $0.11 73 Uruguay $0.03
    34 Portugal $0.10 74 Uganda $0.03
    35 Kuwait $0.10 75 Serbia and Montenegro $0.03
    36 Czech Republic $0.10 76 Nepal $0.03
    37 Brazil $0.10 77 Moldova $0.03
    38 Mexico $0.09 78 Macedonia [FYROM] $0.03
    39 Japan $0.09 79 Cyprus $0.03
    40 Hong Kong $0.09 80 Cambodia $0.03

    Như các bạn đã thấy ở trên, mặc dù Tiếng Việt của chúng ta được Google AdSense hỗ trợ, song số tiền được chi trả cho mỗi lượt click lại quá thấp, có thể nói là nằm cuối bảng. Vậy nên, nếu bạn muốn thực sự kiếm nhiều tiền từ AdSense, tôi khuyên bạn nên xây dựng blog/ website bằng tiếng Anh hoặc ngôn ngữ của các nước có CPC cao.

  • How to remove extra spaces in Word document

    How to remove extra spaces in Word document

    How to remove extra spaces in Word document

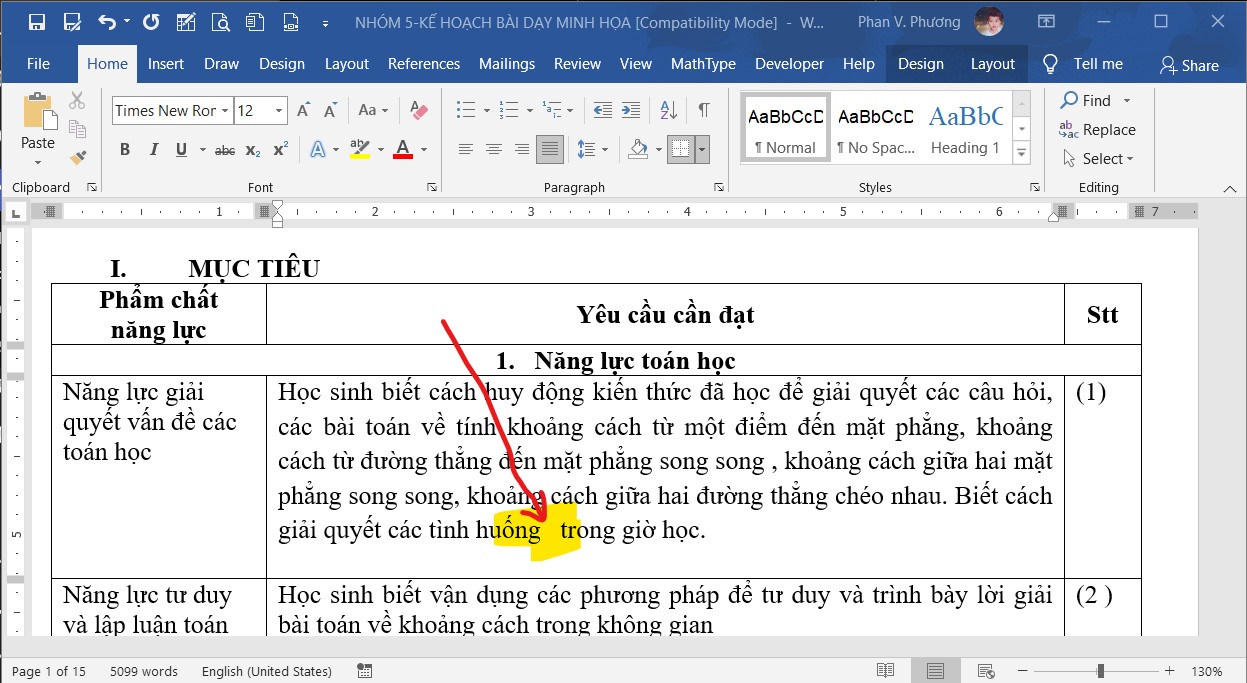
    How to Quickly Remove Double Spaces in Word. If you get a Word document with double spaces, you can quickly strip out the extra spaces to meet modern standards by following these steps.

    remove extra spaces

    👉30 windows shortcuts keyboard must know

    1. How to Remove Double Spaces in Word

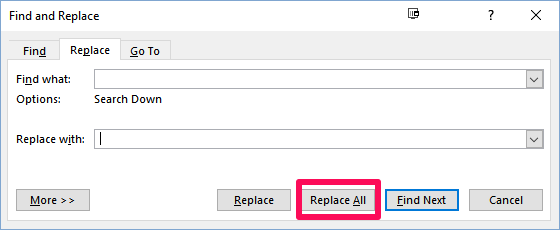
    1. Hit CTRL+H to open the Find and Replace window.
    2. Type two spaces in the Find what field.
    3. Type one space in the Replace with field.
    4. Click Replace All.
    5. Repeat these steps until your document has no double spaces.
    Remove Double Spaces in Word

    That’s all there is to it. Word will change the double spaces to single spaces and tell you how many replacements it made. Click No to searching the rest of the document, since you already selected all of the text.

    2. How to Remove Extra Spaces using Wildcards

    This way applies to remove extra space from the document in IndoEuropean languages, like English, Greek, and Italic.

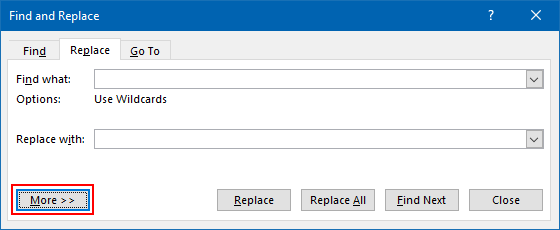
    • Step 1: Press Ctrl+H to open Find and Replace dialog.
    • Step 2: Press More button to show more option.

    Find and Replace dialog

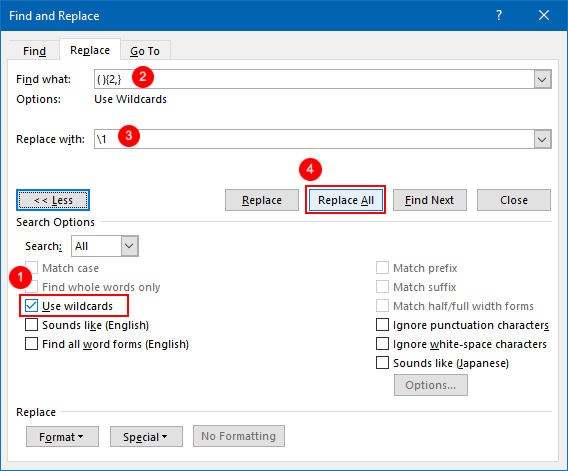
    • Step 3: Select the Use wildcards check box.
    • Step 4: Then type ( ){2,} in Find what field, and \1 in Replace with field.

    Remove Extra Spaces in Word

    • Step 5: Click on Replace All button to remove all extra spaces. When finished, click OK.

    These are shortcuts that you might find useful:

    • Ctrl+H opens the Search and Replace dialog box.
    • F5 opens the Search and Replace dialog box with its Go To tab active.
    • Ctrl+Alt+Z toggles around the four previous place in which you edited the document.
    • Ctrl+Click with the insertion pointer anywhere in a sentence to select that sentence.
    • Double Click anywhere in a word to select that word.
    • Triple Click anywhere in a paragraph to select that paragraph.
    • Shift+End extends your selection to the end of the line.
    • Shift+Home extends your selection to the beginning of the line.
    • Ctrl+UpArrow moves to the beginning of the current paragraph and subsequently to the beginning of the previous paragraph.
    • Ctrl+DownArrow moves to the beginning of the next paragraph.
    • Ctrl+Delete
      • when insertion pointer is within a word, deletes the rest of that word;
      • if a word is selected, then deletes that word, just as would Delete on its own;
      • when insertion pointer is between words, deletes the next word.
    • Ctrl+Backspace
      • when insertion pointer is within a word, deletes the characters in that word leading up to the pointer’s position;
      • when insertion pointer is between words, deletes the word to the left.
  • How to take a screenshot on Windows 10

    How to take a screenshot on Windows 10

    How to take a screenshot on Windows 10

    Take a screenshot on Windows 10 (Copy the window or screen contents). When using Office programs with Windows, there are two ways to copy the contents of what you see on your screen (commonly referred to as a “screen shot” or “screen capture”). You can use the Snipping Tool or the PRINT SCREEN key.

    #1. Using the Snipping Tool to Take a screenshot on Windows 10

    The Windows Snipping Tool captures all or part of your PC screen. After you capture a snip, it’s automatically copied to the Snipping Tool window. From there you can edit, save, or share the snip.

    Use Snipping Tool to capture screenshots on Windows 10, Windows 8.1, Windows 7

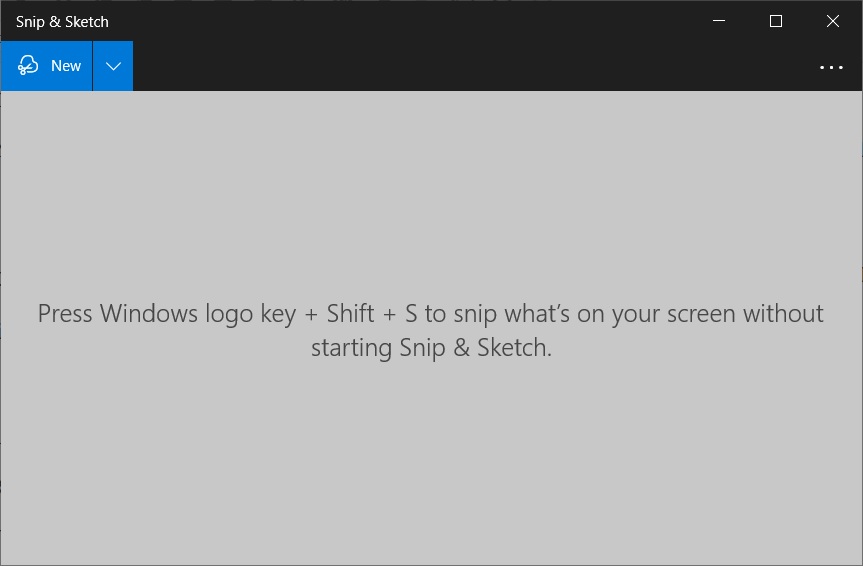
    Take a snapshot to copy words or images from all or part of your PC screen. Use Snipping Tool to make changes or notes, then save, and share.Windows 10 has another screenshot app you might also like to try. When you open Snipping Tool, you’ll see an invitation and keyboard shortcut to Snip & Sketch.

    take a screenshoot

    Capture any of the following types of snips:

    Free-form snip Draw a free-form shape around an object.
    Rectangular snip Drag the cursor around an object to form a rectangle.
    Window snip Select a window, such as a dialog box, that you want to capture.
    Full-screen snip Capture the entire screen.

    When you capture a snip, it’s automatically copied to the Snipping Tool window where you make changes, save, and share.

    #2. Using the PRINT SCREEN key

    Pressing PRINT SCREEN captures an image of your entire screen and copies it to the Clipboard in your computer’s memory. You can then paste (CTRL+V) the image into a document, email message, or other file.

    Where is the PRINT SCREEN button?

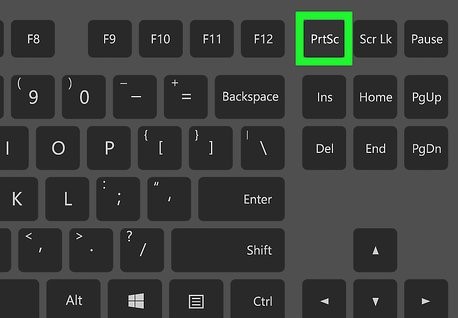
    The PRINT SCREEN key is usually located in the upper right corner of your keyboard. The key looks similar to the following:

    how to take a screenshot

    The text you see on your keyboard might be PrtSc, PrtScn, or PrntScrn. The other text on the Print Screen key is usually SysRq.

    Copy only the image of the active window

    The active window is the window that you are currently working in. Only one window can be active at a time.

      1. Click the window that you want to copy.
      2. Press ALT+PRINT SCREEN.
      3. Paste (CTRL+V) the image into an Office program or other application.

    Copy the entire image on the screen

    1. Open everything you want to copy and position it the way you want.
    2. Press PRINT SCREEN.
    3. Paste (CTRL+V) the image into an Office program or other application.

    Modify the image

    • Paste (CTRL+V) the image into a drawing application, such as Microsoft Paint, and by using the tools available in your drawing application, you can add circles around text or images you want to highlight or crop anything that you don’t want to appear in the image.

      For more complex modifications, it is recommended that you use the Snipping Tool to capture your screen shot.

  • 30 windows shortcuts keyboard must know

    30 windows shortcuts keyboard must know

    30 windows shortcuts keyboard must to know

    Keyboard shortcuts are keys or combinations of keys that provide an alternative way to do something that you’d typically do with a mouse.

    See more: Realtek Audio Console Download

    Basic Windows keyboard shortcuts

    • Ctrl+Z: Undo. No matter what program you’re running, Ctrl+Z will roll back your last action. Whether you’ve just overwritten an entire paragraph in Microsoft Word or deleted a file you didn’t mean to, this one is an absolute lifesaver.
    • Ctrl+A: Select all. This command lets you highlight all the text in a document or select all the files in a folder. Hitting Ctrl+A can save you time you’d otherwise spend clicking and dragging your mouse.
    • Ctrl + X: Cut the selected item.
    • Ctrl + C (or Ctrl + Insert): Copy the selected item.
    • Ctrl + V (or Shift + Insert): Paste the selected item.
    • Windows logo key  + L: Lock your PC.
    • F2: Rename the selected item. Simply highlight a file and hit F2 to give it a new name. This command also lets you edit text in other programs—tap F2 in Microsoft Excel, for example, and you’ll be able to edit the contents of the cell you’re in.
    • F3: Search for a file or folder in File Explorer.
    • F4: Display the address bar list in File Explorer.
    • F5: Refresh the active window. While you’re exploring the function key row, take a look at F5. This key will refresh a page—a good trick when you’re using File Explorer or your web browser. After the refresh, you’ll see the latest version of the page you’re viewing.
    • PrtScn: Take a screenshot of your whole screen and copy it to the clipboard.

    You can change this shortcut so it also opens  screen snipping, which lets you edit your screenshot. Select Start  Settings Ease of Access Keyboard, and turn on the toggle under Print Screen shortcut.  Use PrtScn key to open screen snipping

    windows shortcuts, windows keyboard shortcut

    Windows navigation shortcuts

    • Win+D: Show or hide the desktop. This keyboard combo minimizes all your open windows, bringing your home screen into view. If you store rows and rows of files and shortcuts on your desktop, Win+D will let you access them in in moments.
    • Win+left arrow or Win+right arrow: Snap windows. Snapping a window simply opens it on one side of the screen (left or right, depending on which arrow you hit). This allows you to compare two windows side-by-side and keeps your workspace organized.
    • Win+Tab: Open the Task view. Like Alt+Tab, this shortcut lets you switch apps, but it does so by opening an updated Windows application switcher. The latest version shows thumbnails of all your open programs on the screen.
    • Tab and Shift+Tab: Move backward and forward through options. When you open a dialog box, these commands move you forward (Tab) or backward (Shift+Tab) through the available options, saving you a click. If you’re dealing with a dialog box that has multiple tabs, hit Ctrl+Tab or Ctrl+Shift+Tab to navigate through them.
    • Ctrl+Esc: Open the Start menu. If you’re using a keyboard that doesn’t have a Windows key, this shortcut will open the Start menu. Otherwise, a quick tap of the Windows key will do the same thing. From there, you can stay on the keyboard and navigate the Start menu with the cursor keys, Tab, and Shift+Tab.
    • Alt + Esc: Cycle through items in the order in which they were opened.
    • Alt + Left arrow: Go back.
    • Alt+Tab: Switch apps. This baby is one of the classic Windows shortcuts, and it can be hugely useful when you’re running multiple applications. Just press Alt+Tab and you’ll be able to quickly flick through all your open windows.
    • Alt+F4: Close apps. Another old-school shortcut, Alt+F4 shuts down active apps so you can skip the process of hunting down their on-screen menus. Don’t worry about losing unsaved work with this command—it will prompt you to save your documents before closing them.

    Advanced Windows shortcut tricks

    • Windows logo key + R: Open the Run dialog box.
    • Windows logo key + P. Choose a presentation display mode.
    • Windows logo key + period (.) or semicolon (;):  Open emoji panel.
    • Win+I: Open Settings. Any time you want to configure the way Windows works, hit this keyboard shortcut to bring up the Settings dialog. Alternatively, use Win+A to open up the Action Center panel, which shows notifications and provides quick access to certain settings.
    • Win+S: Search Windows. The Windows taskbar has a handy search box that lets you quiz Cortana or sift through your applications and saved files. Jump straight to it with this keyboard shortcut, then type in your search terms.
    • Win+PrtScn: Save a screenshot. No need to open a dedicated screenshot tool: Win+PrtScn grabs the whole screen and saves it as a PNG file in a Screenshots folder inside your Pictures folder. At the same time, Windows will also copy the image to the clipboard. If you don’t want to snap the whole screen, the Alt+PrtScn combination will take a screenshot of just the active window, but it will only copy this image to the clipboard, so you won’t get a saved file.
    • Ctrl+Shift+Esc: Open the Task Manager. The Task Manager is your window into everything running on your Windows system, from the open programs to the background processes. This shortcut will call up the Task Manager, no matter what application you’re using.
    • Win+C: Start talking to Cortana. This shortcut puts Cortana in listening mode, but you must activate it before you can give it a whirl. To do so, open Cortana from the taskbar search box, click the cog icon, and turn on the keyboard shortcut. Once you’ve enabled the shortcut, hit the Win+C whenever you want to talk to the digital assistant. You can do this instead of, or in addition to, saying, “Hey Cortana.”
    • Win+Ctrl+D: Add a new virtual desktop. Virtual desktops create secondary screens where you can stash some of your open applications and windows, giving you extra workspace. This shortcut lets you create one. Once you have, click the Task View button to the right of the taskbar search box to switch from one desktop to another. Or stick with shortcuts: Win+Ctrl+arrow will cycle through your open desktops, and Win+Ctrl+F4 will close whichever one you’re currently viewing and shift your open windows and apps to the next available virtual desktop.

    You can see more Windows Shortcuts here.